IdP internal OIDC
Use this runbook to connect Kubernetes to the internal ZITADEL instance as an OIDC identity provider.
It covers both the ZITADEL console configuration that is specific to Kubernetes and the cluster-side configuration (API server flags and RBAC).
General internal IdP deployment (namespace, HelmRelease, PostgreSQL, SMTP, base tenants) is documented separately in the Internal Identity Deployment and Console guides.
Identity provider series
- IdP dual overview
- IdP dual architecture
- IdP internal deployment
- IdP internal console
- IdP internal SMTP
- IdP internal LDAP
- IdP internal OIDC - you are here
- IdP internal OAUTH2 proxy
- IdP internal backup and restore
0. Design decisions
There is an open issue where only the first memberOf value is mapped when you try to map multiple memberOf entries from LDAP.
0.1 ZITADEL limitation
- If a user has
memberOf: cn=k8s-admins,...and other groups, ZITADEL may only see the first one, depending on order. - That makes “LDAP group → groups claim” potentially risky if the user has more than one group assigned in LDAP.
LDAP attributes can be exposed, but multi-group fidelity is not guaranteed.
0.2 Use ZITADEL roles not NAS groups
- LDAP is “how you log in”.
- Authorisation is modelled by ZITADEL roles, not NAS groups.
- LDAP
memberOfis not used for authorisation.
1. Goal and scope
Goal: Configure Kubernetes components so that:
- Users authenticate against the internal ZITADEL instance via OIDC.
- ZITADEL roles (grants) are flattened into a
groupsclaim in the token. - The Kubernetes API server reads that
groupsclaim via OIDC. - Kubernetes RBAC grants permissions based on those groups.
This guide covers:
- Console-side steps that are specific to Kubernetes:
- Project and role for cluster administration.
kubernetes-apiOIDC client for the API server andkubelogin.
- Cluster-side steps:
- API server OIDC flags.
- ClusterRoleBinding for OIDC admins.
This is the same pattern used by tools such as Argo CD and Grafana: a ZITADEL Action converts project roles into a groups claim that downstream systems can consume as-is.
High-level flow:
- Keep kubeconfig clean, with a single, known-good admin context.
- In ZITADEL, grant roles (
cluster-admin) to specific users. - Create a ZITADEL Action to flatten project roles into a token
groupsclaim. - Configure the API server to use that
groupsclaim for RBAC. - Create RBAC bindings against those groups (for example
oidc:cluster-admin). - Add a clean
kubeloginuser and context to kubeconfig to test the full flow. - Decode a real token to verify the claims.
1.1 Read-only cluster role
Provide a role called cluster-read-only that:
- Can list, get and watch resources.
- Cannot create, update or delete resources.
- Cannot exec into pods or otherwise change running workloads.
The pattern:
- ZITADEL role
cluster-read-only(project-level). groupsClaimAction emits"groups": ["cluster-read-only"]for users with that grant.- Kubernetes API server reads
groupsand applies--oidc-groups-prefix=oidc:. - A
ClusterRoleBindingmapsGroup oidc:cluster-read-onlyto the built-inClusterRole view.
Result: anyone with the ZITADEL role cluster-read-only gets read-only access wherever the view ClusterRole allows.
2. Prerequisites
Before changing any configuration, you should already have:
- Internal ZITADEL deployed and healthy:
https://auth.internal.example.com/ui/console
- Admin account created and password changed.
- SMTP configured so ZITADEL can send emails.
- NAS LDAP reachable from the cluster via LDAPS (
nas.internal.example.com:636). - TLS trust for
*.internal.example.comconfigured into the cluster so ZITADEL pods trust the NAS LDAPS endpoint viaSSL_CERT_FILE.
Project roles are assigned to users via Authorizations (user grants). LDAP still matters because it is how users sign in (and how you keep identities central), but the mapping from 'this person is an admin' to cluster-admin is handled via ZITADEL roles and grants.
From the console side you will create in this guide:
- Project:
Kubernetes Infrastructure. - Role:
cluster-adminin that project. - NAS LDAP identity provider:
nas. - Authorizations that give selected users the
cluster-adminrole. - Application:
kubernetes-api(web OIDC) used bykubelogin.
Keep any client IDs and secrets in your password manager.
3. Console configuration for Kubernetes
3.1 Kubernetes infrastructure project
Create
Kubernetes Infrastructureproject.
In the ZITADEL console at https://auth.internal.example.com:
- Go to
Projects → Create new project. - Set:
- Name:
Kubernetes Infrastructure
- Name:
- Save.
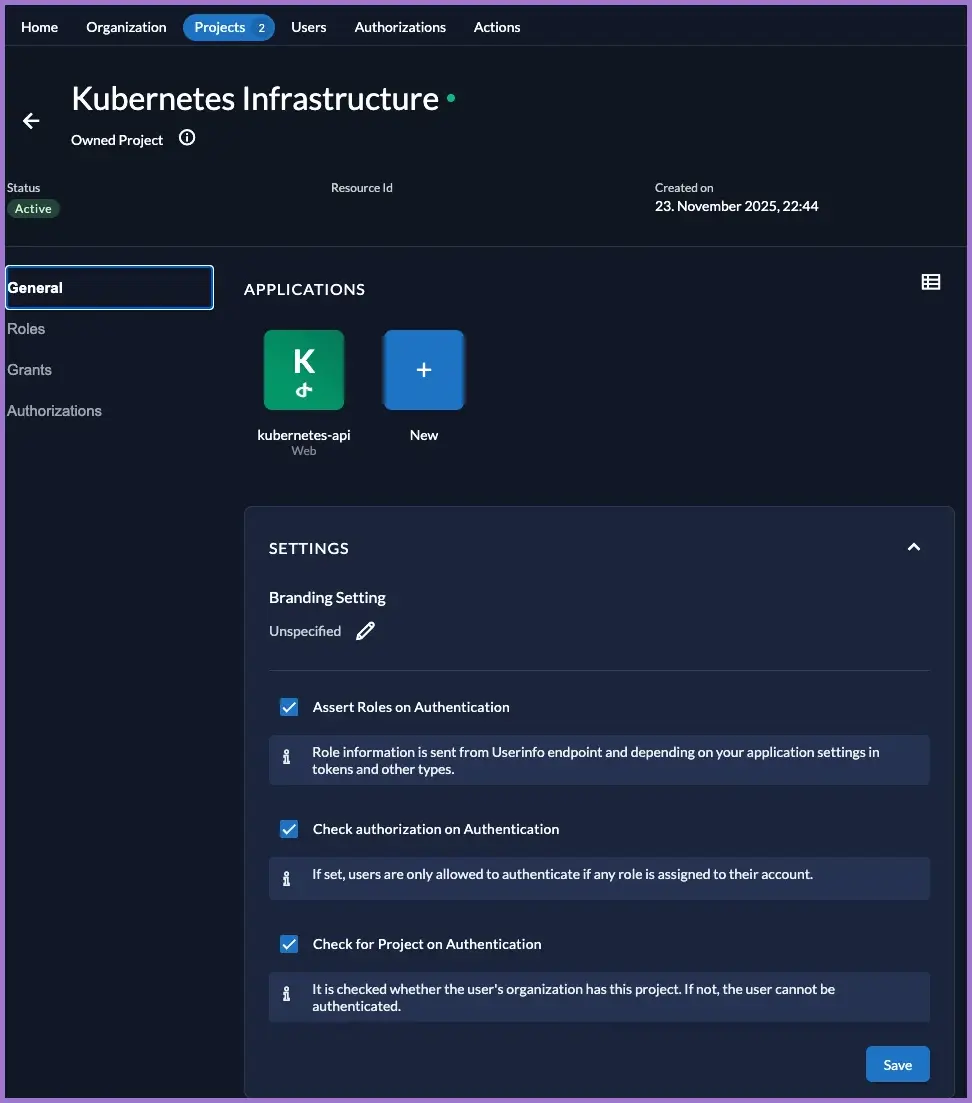
Keep this project dedicated to Kubernetes-related roles and applications.
3.2 Kubernetes infrastructure roles
Create
cluster-adminrole.
Still in the Kubernetes Infrastructure project:
- Go to
Projects → Kubernetes Infrastructure → Roles. - Click New.
- Set:
- Key:
cluster-admin - Display Name:
Cluster administrator - Leave Group empty (optional, for UI grouping only).
- Key:
- Save.
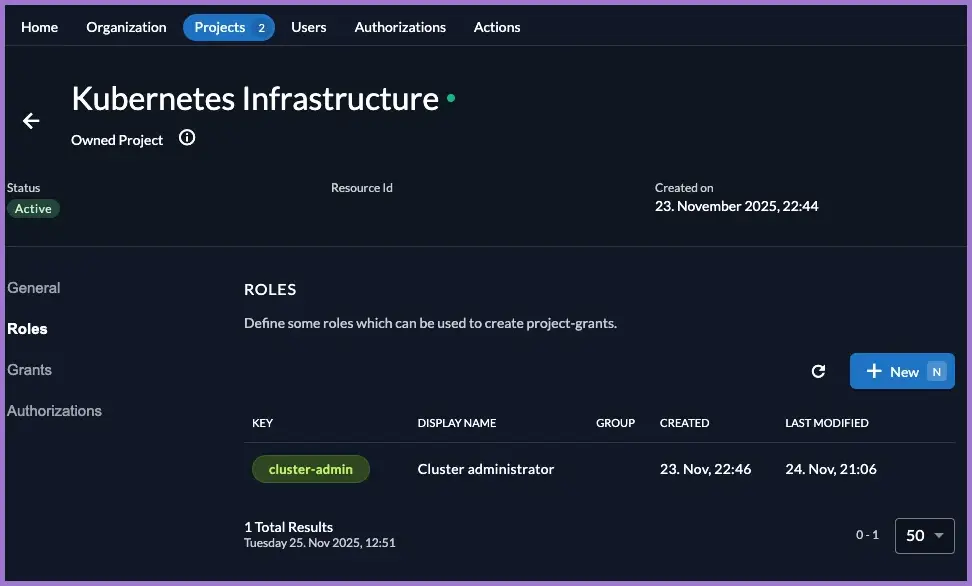
You now have a role that represents full cluster administration rights and can be used across multiple Kubernetes-related apps.
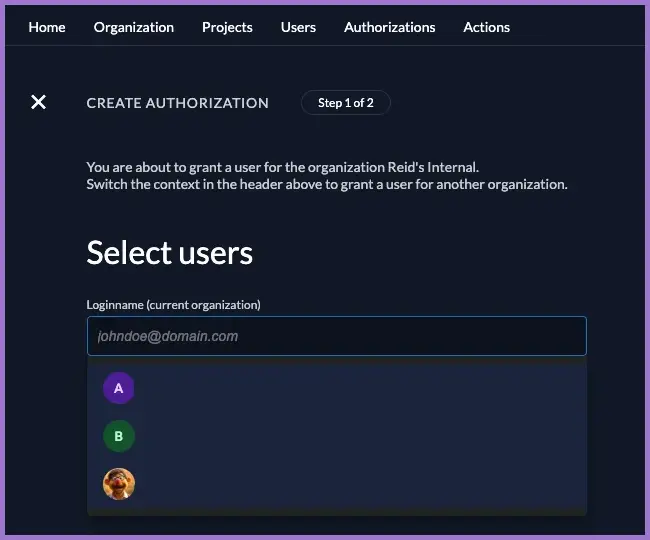
3.3 Kubernetes infrastructure authorizations
Grant the
cluster-adminrole to the users who should administer the cluster.
For each admin user:
- Make sure they can sign in via LDAP (for example, a NAS user
NAS_USERNAME). - In the console, go to
Projects → Kubernetes Infrastructure → Authorizations. - Click New.
- Select the User from the dropdown list (for example
AUTHORISED_USER_EMAIL). - Select Roles:
cluster-admin. - Save.
If a user without any role on this project attempts to log in to a Kubernetes application, they will see:
Login not possible. The user is required to have at least one grant on the application.
Assigning at least one role (for example cluster-admin) removes this error.
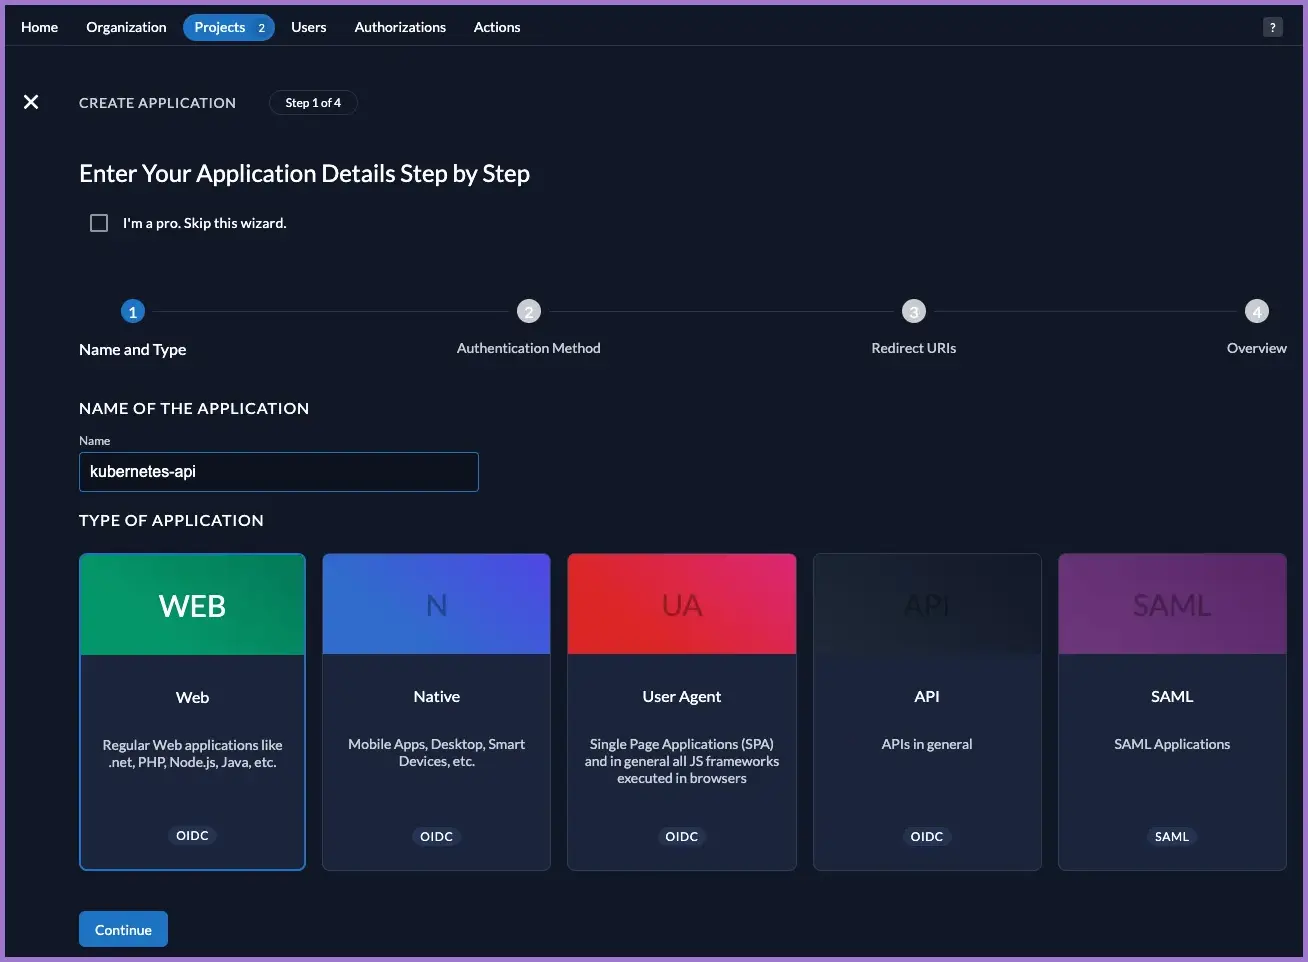
3.4 Kubernetes infrastructure kubernetes-api application
Create
kubernetes-apiapplication.
This is the OIDC client used by kubelogin / kubectl and referenced by the API server.
- In the
Kubernetes Infrastructureproject go toApplications → New. - Select Web as the type.
- Name the application:
- Name:
kubernetes-api
- Name:
- Click Continue.
On the authentication method wizard:
- Choose PKCE (authorisation code flow with random hash).
- Continue to the redirect step.
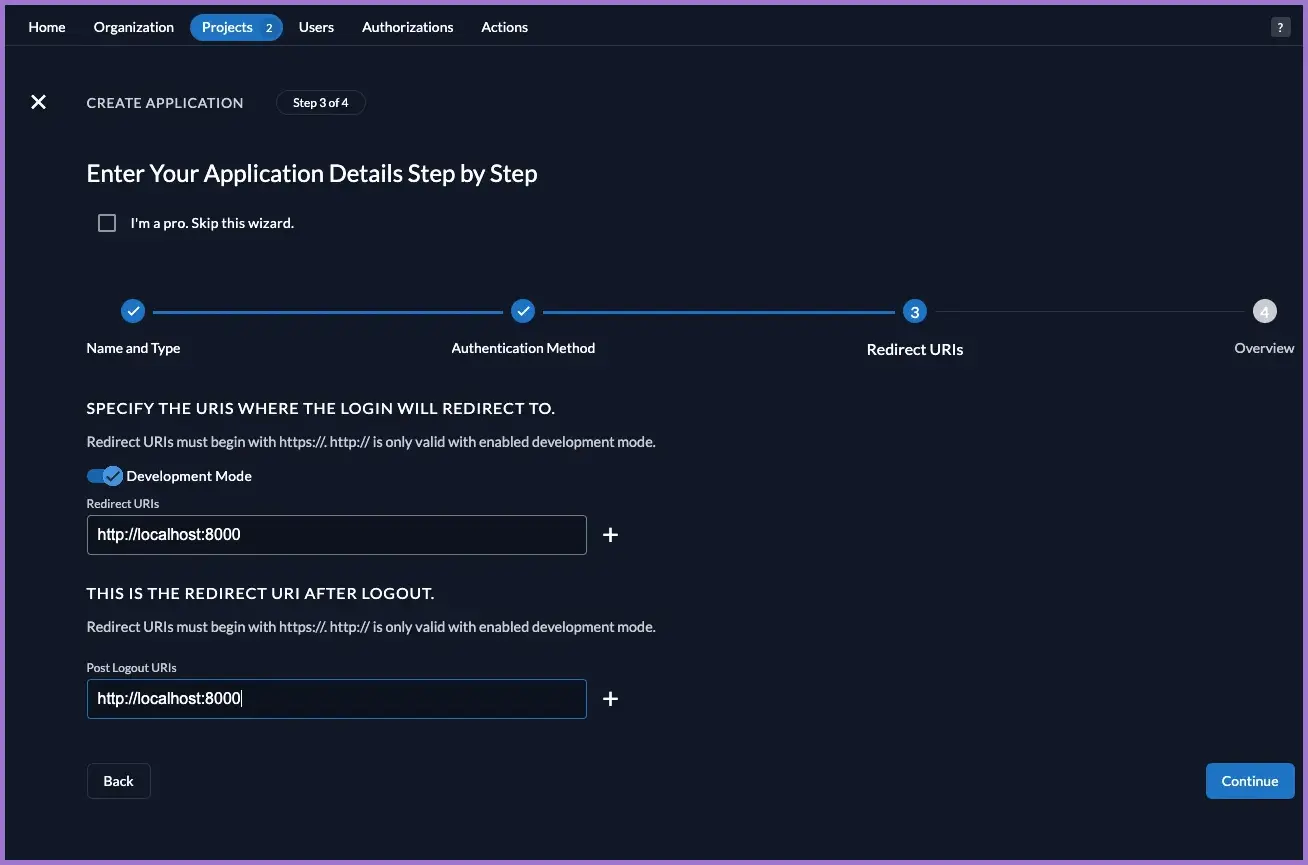
On the redirect step:
- Enable Development Mode (allows
http://redirects). - Add:
- Redirect URIs:
http://localhost:8000 - Post Logout URIs:
http://localhost:8000
- Redirect URIs:
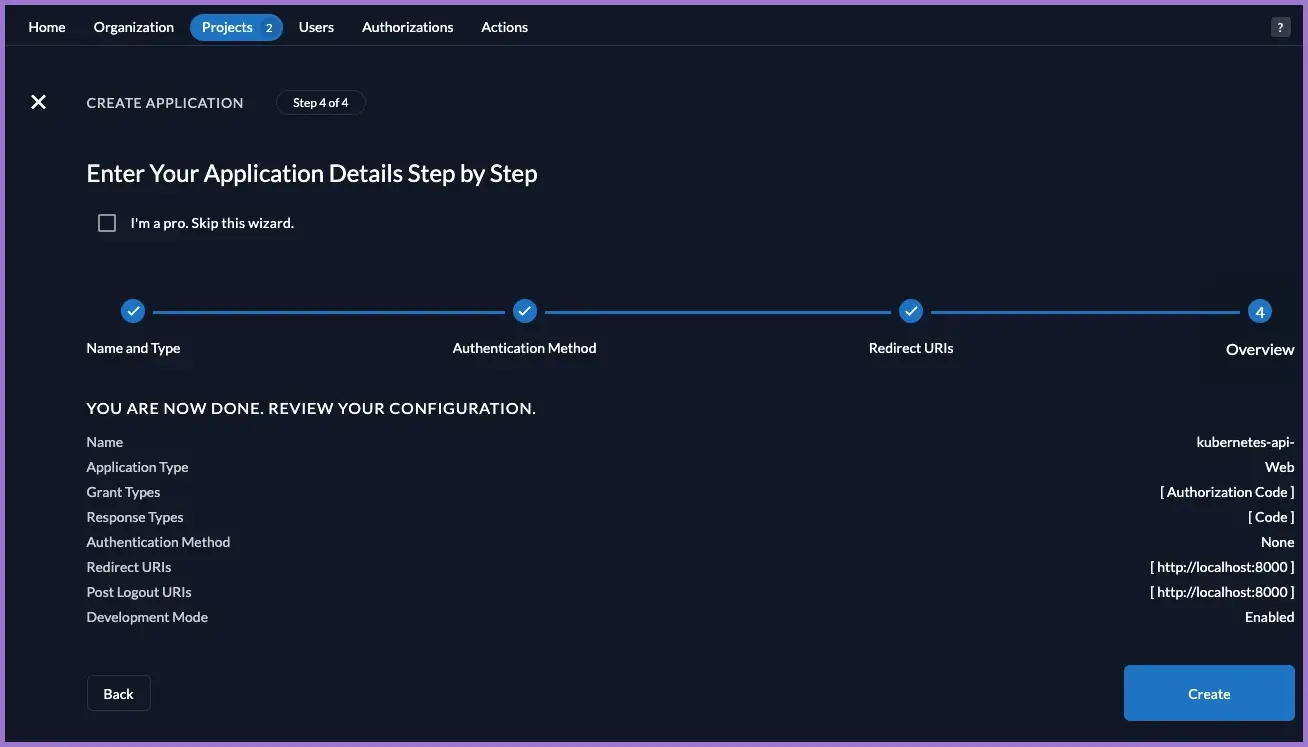
- Confirm and create the application.
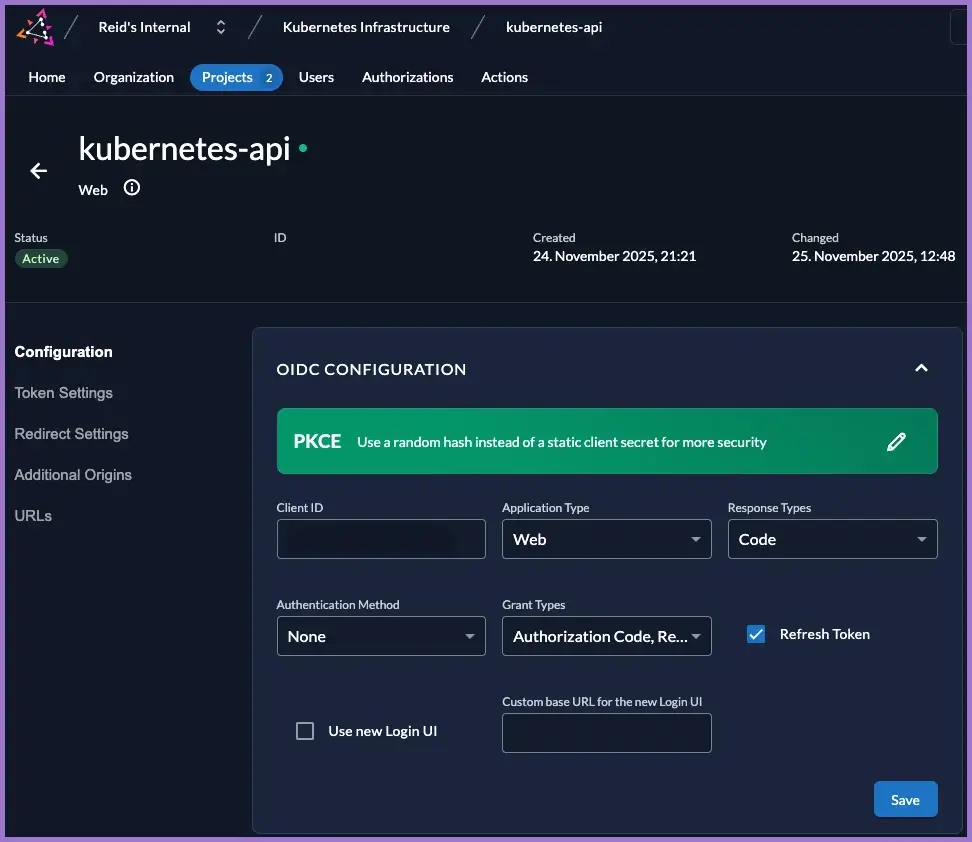
3.5 Adjust kubernetes-api OIDC configuration
Open the kubernetes-api app and adjust the settings.
- Go to
Projects → Kubernetes Infrastructure → Applications → kubernetes-api. - Under OIDC Configuration:
- Application Type:
Web - Response Types:
Code - Authentication Method:
None - Grant Types: tick both:
Authorization CodeRefresh Token
- Application Type:
- Tick Refresh Token.
- Click Save.
When Refresh Token is enabled and the client requests offline_access, ZITADEL issues:
- a short-lived access / ID token (what the API server uses), and
- a long-lived refresh token.
kubelogin can silently swap the refresh token for new access tokens when they expire, so you stay logged in.
If Refresh Token is not enabled:
- You still log in fine.
- When the token expires,
kubeloginhas to send you back through the browser flow again.

3.5.1 Redirect settings
- Open the Redirect Settings tab.
- Ensure:
- Development Mode: enabled.
- Redirect URIs:
http://localhost:8000 - Post Logout URIs:
http://localhost:8000
- Save.
3.5.2 Token settings
- Open the Token Settings tab.
- Leave Auth Token Type:
Bearer Token. - Tick:
- If selected, the requested roles of the authenticated user are added to the access token.
- User roles inside ID Token.
- Optionally User Info inside ID Token (useful for debugging).
- Save.
These options ensure that the ID and access tokens contain role information which Kubernetes can later map to RBAC principals.
3.5.3 Discovery URLs and client secret
- Open the URLs tab and note the endpoints. The important values are:
- Issuer:
https://auth.internal.example.com - JWKS URI:
https://auth.internal.example.com/oauth/v2/keys - Authorization Endpoint:
https://auth.internal.example.com/oauth/v2/authorize - Token Endpoint:
https://auth.internal.example.com/oauth/v2/token
- Issuer:
- From the Actions menu, generate a Client Secret for
kubernetes-apiand store it securely.
| Endpoint | URL |
|---|---|
| Authorization Endpoint | https://auth.internal.example.com/oauth/v2/authorize |
| Device Authorization Endpoint | https://auth.internal.example.com/oauth/v2/device_authorization |
| End Session Endpoint | https://auth.internal.example.com/oidc/v1/end_session |
| Introspection Endpoint | https://auth.internal.example.com/oauth/v2/introspect |
| JWKS URI | https://auth.internal.example.com/oauth/v2/keys |
| Revocation Endpoint | https://auth.internal.example.com/oauth/v2/revoke |
| Token Endpoint | https://auth.internal.example.com/oauth/v2/token |
| Userinfo Endpoint | https://auth.internal.example.com/oidc/v1/userinfo |
You will use:
https://auth.internal.example.comas the issuer URL.- The
kubernetes-apiclient ID (a generated value, not literallykubernetes-api). - The generated client secret.
These are referenced by kubelogin and the API server but are not committed to Git.
4. Expose roles as a groups claim with a ZITADEL Action
Because there is no native “LDAP group DN → role” mapping, the supported pattern is:
- Assign project roles via grants (Authorizations).
- Use a ZITADEL Action to convert those roles into a
groupsclaim in the token. - Configure Kubernetes to use that
groupsclaim for RBAC.
4.1 Create the groupsClaim Action
In ZITADEL console:
- Go to
Actions → New. - Set:
- Name:
groupsClaim - Type: JavaScript Action.
- Name:
- Use the following code as a starting point:
/**
 * Flatten all project role keys into a "groups" claim.
 *
 * Resulting token claim example:
 *   "groups": ["cluster-admin", "viewer"]
 *
 * Flow: Complement Token
 * Triggers: Pre Userinfo creation, Pre access token creation
 */
function groupsClaim(ctx, api) {
  if (!ctx.v1.user || !ctx.v1.user.grants || ctx.v1.user.grants.count === 0) {
    return;
  }

  const groups = [];

  ctx.v1.user.grants.grants.forEach((grant) => {
    // Optional: restrict to specific project by projectId:
    // if (grant.projectId !== "KUBERNETES_INFRA_PROJECT_ID") {
    //   return;
    // }

    grant.roles.forEach((roleKey) => {
      if (!groups.includes(roleKey)) {
        groups.push(roleKey);
      }
    });
  });

  api.v1.claims.setClaim("groups", groups);
}
- Tick Allowed to fail (so an Action bug does not break all logins).
- Save the Action.
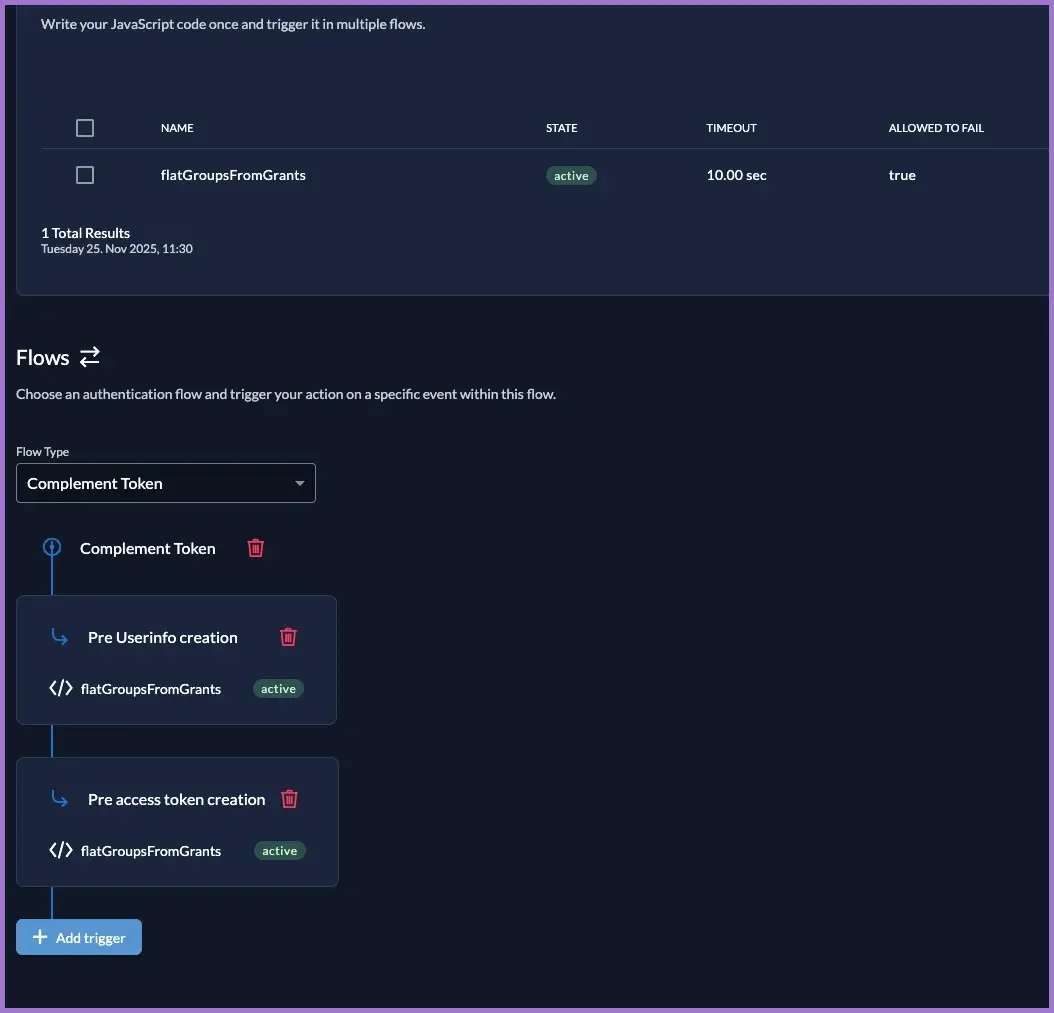
4.2 Attach the Action to the Complement Token flow
- Go to
Actions → Flows. - Select the Complement Token flow.
- Add a trigger:
- Function:
groupsClaim - Trigger:
Pre Userinfo creation.
- Function:
- Add another trigger:
- Function:
groupsClaim - Trigger:
Pre access token creation.
- Function:
- Save.
Now, whenever a token is created, ZITADEL will:
- Inspect the user’s grants.
- Collect the role keys from each grant.
- Write them into a
groupsclaim, for example["cluster-admin"].
5. Configure API server to use the groups claim
Update the Kubernetes API server to use the new groups claim produced by the Action.
5.1 OIDC flags
Do not save any other files in the /etc/kubernetes/manifests/ directory, such as a copy of the kube-apiserver.yaml. It is watched by the system and will restart the API server with possible failure.
Edit /etc/kubernetes/manifests/kube-apiserver.yaml on each control plane node and add the OIDC flags.
Put quotes around the --oidc-username-prefix and --oidc-groups-prefix lines. Without quotes, the API server will fail to start.
Example snippet (do not duplicate existing flags):
spec:
  containers:
  - command:
    - kube-apiserver
    # existing flags...
    - --tls-private-key-file=/etc/kubernetes/ssl/apiserver.key
    # Add after tls-private-key-file
    - --oidc-issuer-url=https://auth.internal.example.com
    - --oidc-client-id=CHANGE-ME-KUBERNETES-API-OIDC-CLIENT-ID
    - --oidc-username-claim=email
    - --oidc-groups-claim=groups
    - "--oidc-username-prefix=oidc:"
    - "--oidc-groups-prefix=oidc:"
    # Add before image
    image: registry.k8s.io/kube-apiserver:v1.31.9
--oidc-client-idmust match the Client ID of thekubernetes-apiapp in theKubernetes Infrastructureproject.--oidc-groups-claim=groupstells the API server to read thegroupsclaim written by the Action.- Prefixes (
oidc:) keep OIDC identities distinct from any future in-cluster users.
5.2 Restart and verify API server
Save the manifest; the static pod will restart automatically. Wait up to a minute.
Monitor status from the control plane node:
# Local health
curl -k https://127.0.0.1:6443/healthz
# From your workstation (admin context)
kubectl get nodes
Only continue once the API server is healthy and kubectl get nodes works again from your workstation.
During API server restart a number of cluster pods will go into the CrashLoopBackOff state.
Anything that talks to the API as part of its own liveness/readiness (Calico controllers, cert-manager bits, Flux controllers, metrics-server) will either:
- fail probes and restart, or
- hit BackOff / CrashLoopBackOff if the API is unavailable for long enough.
Workload pods that mount projected service account secrets (kube-api-access-*) or use the secret/configmap caches (like GitLab runner) will log FailedMount errors until the API / informers are healthy again.
Once the API server has come back and stabilised, all of these should naturally return to Ready without manual intervention; during control-plane changes you can expect these specific controllers to look “unhealthy” or CrashLoop until the API is reachable again.
6. RBAC binding using the OIDC groups claim
Once the API server is using the groups claim, any user with the cluster-admin role in ZITADEL will receive:
"groups": ["cluster-admin"]
The prefix --oidc-groups-prefix=oidc: means Kubernetes will see the group as oidc:cluster-admin.
6.1 ClusterRoleBinding for cluster-admins
From an admin context on your workstation:
cat <<EOF | kubectl apply -f -
apiVersion: rbac.authorization.k8s.io/v1
kind: ClusterRoleBinding
metadata:
  name: oidc-cluster-admin
roleRef:
  apiGroup: rbac.authorization.k8s.io
  kind: ClusterRole
  name: cluster-admin
subjects:
- kind: Group
  name: "oidc:cluster-admin"
  apiGroup: rbac.authorization.k8s.io
EOF
Verify:
kubectl get clusterrolebinding oidc-cluster-admin -o yaml
apiVersion: rbac.authorization.k8s.io/v1
kind: ClusterRoleBinding
metadata:
  annotations:
    kubectl.kubernetes.io/last-applied-configuration: |
      {"apiVersion":"rbac.authorization.k8s.io/v1","kind":"ClusterRoleBinding","metadata":{"annotations":{},"name":"oidc-cluster-admin"},"roleRef":{"apiGroup":"rbac.authorization.k8s.io","kind":"ClusterRole","name":"cluster-admin"},"subjects":[{"apiGroup":"rbac.authorization.k8s.io","kind":"Group","name":"oidc:cluster-admin"}]}
  creationTimestamp: "2025-11-25T02:32:21Z"
  name: oidc-cluster-admin
roleRef:
  apiGroup: rbac.authorization.k8s.io
  kind: ClusterRole
  name: cluster-admin
subjects:
- apiGroup: rbac.authorization.k8s.io
  kind: Group
  name: oidc:cluster-admin
This does the following:
- Any user whose token contains
groups: ["cluster-admin"]will be treated as part of theoidc:cluster-admingroup. - The API server maps that claim to the subject in the
ClusterRoleBinding. - Those users receive full administrative rights in the cluster.
You can repeat this pattern for other roles, for example mapping a future viewer role to a read-only ClusterRole.
7. Re-add a clean OIDC user and context via kubelogin
With kubeconfig reset, grants configured, the Action in place and the API server updated, you can now add a clean OIDC-based user and context to test the full flow.
7.1 Install kubelogin on macOS
Using Homebrew:
brew install int128/kubelogin/kubelogin
Confirm:
kubelogin version
kubelogin version v1.34.0 (go1.24.5 darwin_arm64)
7.2 Add OIDC user to kubeconfig
Assuming:
- Cluster name:
CLUSTER_NAME. - Context name:
oidc-context. - User name:
oidc-user. - OIDC client:
kubernetes-apiwith a known client ID.
Run:
kubectl config set-credentials oidc-user \
  --exec-api-version=client.authentication.k8s.io/v1 \
  --exec-command=kubelogin \
  --exec-arg=get-token \
  --exec-arg=--oidc-issuer-url=https://auth.internal.example.com \
  --exec-arg=--oidc-client-id=CHANGE-ME-KUBERNETES-API-OIDC-CLIENT-ID \
  --exec-arg=--oidc-extra-scope=email \
  --exec-arg=--oidc-extra-scope=profile \
  --exec-arg=--oidc-extra-scope=offline_access \
  --exec-interactive-mode=IfAvailable
User "oidc-user" set.
Then create a context that uses this user:
kubectl config set-context oidc-context --cluster=CLUSTER_NAME --user=oidc-user
Context "oidc-context" created.
Check contexts:
kubectl config get-contexts
CURRENT   NAME                               CLUSTER           AUTHINFO           NAMESPACE
          oidc-context                       CLUSTER_NAME      oidc-user
You should see:
oidc-context(clusterCLUSTER_NAME, useroidc-user).
kubectl config current-context
7.3 Test the OIDC flow end-to-end
Use the OIDC context per command:
kubectl --context=oidc-context get nodes
Or switch context until you deliberately switch again.
kubectl config use-context oidc-context

Expected behaviour on first run:
kubeloginstarts a local listener onhttp://localhost:8000.- Your browser opens
https://auth.internal.example.com/oauth/v2/authorize...with thekubernetes-apiclient. - You log in as
AUTHORISED_USER_EMAIL(or another user with thecluster-admingrant). - ZITADEL calls the
groupsClaimAction, which writesgroups: ["cluster-admin"]into the token. - The API server sees
groupsand prefixes it tooidc:cluster-admin. - The
ClusterRoleBindinggrantscluster-adminrights andkubectlprints the node list.
If you instead see a Forbidden error, read the User value in the error message to confirm the username format and double-check that:
- The user has a
cluster-admingrant inKubernetes Infrastructure. - The Action is running (token contains a
groupsclaim). - The
ClusterRoleBindingmatches the prefixed group (oidc:cluster-admin).
7.4 Forcing a fresh login
If you need to force a new browser login (for example to test a different user), clear the local OIDC cache used by the plugin:
kubectl oidc-login clean
Deleted the token cache from /Users/YOUR_USER/.kube/cache/oidc-login
Deleted the token cache from the keyring
Run the test command again:
kubectl --context=oidc-test get nodes
You should be prompted to log in again.
8. Optional: decode a real ID token
To prove end-to-end that the token SSO path is working as intended, decode a live ID token issued for kubernetes-api.
-
Find the latest cache entry:
FILE=$(ls -t "${HOME}/.kube/cache/oidc-login"/* | head -1)cat "$FILE"You should see JSON similar to:
{"id_token":"...","refresh_token":"..."} -
Decode the payload with Python 3:
TOKEN=$(jq -r '.id_token' "$FILE")TOKEN="$TOKEN" python3 - << 'EOF'import base64, json, ostoken = os.environ["TOKEN"]parts = token.split(".")payload = parts[1]payload += "=" * (-len(payload) % 4)data = json.loads(base64.urlsafe_b64decode(payload))print(json.dumps(data, indent=2))EOFIn the JSON output you should see:
iss:https://auth.internal.example.com.audandclient_idmatching thekubernetes-apiclient.email:AUTHORISED_USER_EMAIL.groups:["cluster-admin"].- ZITADEL project role claims under
urn:zitadel:iam:org:project:roles.
This proves that:
- ZITADEL is issuing tokens with the correct issuer and audience.
- The
groupsClaimAction is populatinggroupscorrectly from grants.
9. Validation
9.1 ZITADEL health
curl -f https://auth.internal.example.com/debug/healthz
Expected: HTTP 200 from the internal ZITADEL instance.
9.2 LDAP login via console
- Log in as a NAS-backed user via the ZITADEL console.
- Confirm that the user appears in
Projects → Kubernetes Infrastructure → Authorizationswith thecluster-adminrole if they should be an admin.
9.3 kubectl OIDC path
kubectl --context=oidc-test get nodes
Expected:
- Browser-based login via
auth.internal.example.com(on first run). - Successful node listing using OIDC user
oidc:<email>.
If you see Forbidden with the correct OIDC username, auth is working and RBAC needs to be adjusted.
10. cluster-read-only role
Provide a role called cluster-read-only that:
- Can list, get and watch resources.
- Cannot create, update or delete resources.
- Cannot exec into pods or otherwise change running workloads.
The pattern:
- ZITADEL role
cluster-read-only(project-level). groupsClaimAction emits"groups": ["cluster-read-only"]for users with that grant.- Kubernetes API server reads
groupsand applies--oidc-groups-prefix=oidc:. - A
ClusterRoleBindingmapsGroup oidc:cluster-read-onlyto the built-inClusterRole view.
Result: anyone with the ZITADEL role cluster-read-only gets read-only access wherever the view ClusterRole allows.
10.1 Add a cluster-read-only role in ZITADEL
In the Kubernetes Infrastructure project:
- Go to
Projects → Kubernetes Infrastructure → Roles. - Click New.
- Set:
- Key:
cluster-read-only - Display name:
Cluster read-only
- Key:
- Save.
Because the groupsClaim Action flattens all project role keys into groups, any user with this role will get a token like:
"groups": ["cluster-read-only"]
If a user also has cluster-admin, you will see:
"groups": ["cluster-read-only", "cluster-admin"]
You do not need to change the Action; it already uses role keys.
10.2 Grant cluster-read-only to a user
Still in the Kubernetes Infrastructure project:
- Go to
Projects → Kubernetes Infrastructure → Authorizations. - Click New.
- Select:
- User: a NAS-backed user who can sign in via LDAP.
- Roles: tick cluster-read-only (and leave
cluster-adminunticked for a pure read-only user).
- Save.
On the next login via kubelogin against the kubernetes-api client, that user’s token will include "groups": ["cluster-read-only"].
You can confirm this by decoding the ID token as described in the main OIDC guide; look for:
"groups": [
  "cluster-read-only"
]
10.3. Map cluster-read-only to Kubernetes RBAC
The API server is already configured with:
--oidc-groups-claim=groups--oidc-groups-prefix=oidc:
That means a token containing:
"groups": ["cluster-read-only"]
is seen by Kubernetes as the group:
oidc:cluster-read-only
Kubernetes ships with a built-in ClusterRole called view that:
- Allows list/get/watch of most namespaced resources.
- Does not allow writes (create/update/patch/delete).
- Does not include powerful subresources such as
pods/exec.
Create a ClusterRoleBinding mapping oidc:cluster-read-only to this built-in role:
cat <<EOF | kubectl apply -f -
apiVersion: rbac.authorization.k8s.io/v1
kind: ClusterRoleBinding
metadata:
  name: oidc-viewer
roleRef:
  apiGroup: rbac.authorization.k8s.io
  kind: ClusterRole
  name: view
subjects:
- kind: Group
  name: "oidc:cluster-read-only"
  apiGroup: rbac.authorization.k8s.io
EOF
Verify:
kubectl get clusterrolebinding oidc-viewer -o yaml
apiVersion: rbac.authorization.k8s.io/v1
kind: ClusterRoleBinding
metadata:
  annotations:
    kubectl.kubernetes.io/last-applied-configuration: |
      {"apiVersion":"rbac.authorization.k8s.io/v1","kind":"ClusterRoleBinding","metadata":{"annotations":{},"name":"oidc-viewer"},"roleRef":{"apiGroup":"rbac.authorization.k8s.io","kind":"ClusterRole","name":"view"},"subjects":[{"apiGroup":"rbac.authorization.k8s.io","kind":"Group","name":"oidc:cluster-read-only"}]}
  creationTimestamp: "2025-11-25T08:14:26Z"
  name: oidc-viewer
  resourceVersion: "56425581"
  uid: bbb02183-202b-4078-85ab-283448c58ddb
roleRef:
  apiGroup: rbac.authorization.k8s.io
  kind: ClusterRole
  name: view
subjects:
- apiGroup: rbac.authorization.k8s.io
  kind: Group
  name: oidc:cluster-read-only
You should see roleRef.name: view and subjects[0].name: oidc:cluster-read-only.
10.4 Test the viewer permissions
Assuming you already have a kubelogin-based context (for example oidc-context) for a user who only has the cluster-read-only role:
10.4.1 Basic can-i checks
# Nodes are cluster-scoped; view does not usually include them, so this may be "no"
kubectl --context=oidc-context auth can-i list nodes

# Should be allowed (namespaced reads)
kubectl --context=oidc-context auth can-i list pods -A
kubectl --context=oidc-context auth can-i get deployments -A

# Should be denied (writes)
kubectl --context=oidc-context auth can-i delete pod some-pod -n default
kubectl --context=oidc-context auth can-i create deployment -n default
Expected:
- Read verbs (
get,list,watch) for standard namespaced resources:yes. - Cluster-scoped resources such as
nodes: typicallynowhen using the defaultviewClusterRole. - Write verbs (
create,update,patch,delete):no.
10.4.2 Logs vs exec
Check that logs are readable but exec is blocked:
# Logs are read-only, should be allowed
kubectl --context=oidc-context auth can-i get pod/some-pod --subresource=log -n default

# Exec can mutate state, should be denied
kubectl --context=oidc-context auth can-i create pod/some-pod --subresource=exec -n default
Again:
- Logs:
yes. - Exec:
no.
10.5 Troubleshooting
10.5.1 Viewer user gets Forbidden on reads
Check:
- The user has a
cluster-read-onlygrant inKubernetes Infrastructure:Projects → Kubernetes Infrastructure → Authorizations.
- The ID token includes
"groups": ["cluster-read-only"]:- Decode a fresh token and inspect the JSON.
- The
ClusterRoleBindingexists and is correct:kubectl get clusterrolebinding oidc-viewer -o yamlroleRef.nameisview.subjects[0].nameisoidc:cluster-read-only.
If the token has groups but RBAC still denies, the problem is almost always in the ClusterRoleBinding (wrong group name, typo, or missing prefix).
10.5.2 Viewer user can delete or modify resources
Check:
- The user does not have
cluster-admin(or other powerful) roles granted in ZITADEL for this project. - There are no extra
ClusterRoleBindingobjects that grant that user or group elevated roles:kubectl get clusterrolebinding -o yaml | grep -n "oidc-viewer"kubectl get clusterrolebinding -o yaml | grep -n "AUTHORISED_USER_EMAIL"
Remove or correct any stray bindings you created during testing.
11. Rollback
If needed, you can roll back the Kubernetes-side configuration.
11.1 Remove OIDC flags from API server
- Edit
/etc/kubernetes/manifests/kube-apiserver.yaml. - Remove or comment the
--oidc-*flags. - Save and allow the API server pods to restart.
11.2 Remove ClusterRoleBinding
kubectl delete clusterrolebinding oidc-cluster-admin
(Or remove any other OIDC-related ClusterRoleBinding objects you created for testing.)
12. Verification checklist
- Kubeconfig is clean and admin context works.
-
Kubernetes Infrastructureproject exists withcluster-adminrole. -
AUTHORISED_USER_EMAIL(or equivalent) has acluster-admingrant in the project. - The
groupsClaimAction exists and is attached to theComplement Tokenflow. - Tokens for the
kubernetes-apiclient contain agroupsclaim (for example["cluster-admin"]). -
kube-apiserveris configured with--oidc-groups-claim=groupsand prefix flags are quoted. - A
ClusterRoleBindingexists mappingoidc:cluster-adminto the built-incluster-adminrole. -
kubectl --context=oidc-test get nodesworks for the OIDC user viakubelogin. - Anonymous access is denied, for example
kubectl auth can-i list nodes --as=system:anonymousreturnsForbidden.