Clerk setup for Blaster
What is Clerk and why am I using it?
Clerk is a hosted authentication and user management service for modern web apps. It provides sign-in and sign-up flows, session management and social login (such as Google) without you having to build all of that yourself. However, in the future I will migrate to a locally hosted solution.
In Blaster, Clerk is used to:
- Handle secure sign-in and sign-up for players (including Google OAuth).
- Manage user identities, sessions and basic profile data.
- Keep authentication logic and sensitive keys in one place while the app focuses on gameplay and features.
Use this runbook to move Clerk from local development to a production deployment of the Blaster game. It covers Clerk dev and prod instances, domains, Google OAuth, CI variables and Kubernetes wiring.
Blaster GitOps series
- Blaster GitOps summary
- Blaster repo and branches
- Dockerfile & GitLab CI
- Clerk authentication & user setup - you are here
- Google OAuth for Clerk
- Blaster prep for automation
- Dev app k8s manifests
- Dev flux sources & Kustomizations
- Dev image automation
- Dev SOPS & age
- Dev verification & troubleshooting
- Dev full runbook
- Prod overview
- Prod app k8s manifests and deployment
- Prod Flux GitOps and image automation
- Prod Cloudflare, Origin CA and tunnel routing
- Prod full runbook
- Post development branches
Overview
What this page covers
- Separate Clerk instances for development and production.
- Account portal domains and redirect URLs.
- Google OAuth configuration at a high level (details live on the Google page).
- Environment-specific Clerk publishable keys in GitLab CI.
- Kubernetes ConfigMap and Secret wiring.
- Testing flows for new and existing users.
High-level architecture
Development
  - Clerk dev instance       → accounts.dev.yourdomain.com (or Clerk-hosted)
  - Google OAuth (Testing mode + test users)
  - Dev database

Production
  - Clerk prod instance      → accounts.yourdomain.com
  - App domain               → yourdomain.com
  - Google OAuth (Published app)
  - Production database
Keep dev and prod completely separate. Do not share keys, databases or domains between environments.
1. Clerk development setup
1.1 Create a development Clerk application
- Sign in to the Clerk Dashboard.
- Click
+ Create application. - Name it something like
Blaster – Development. - Enable sign-in methods you want to use in dev:
- Google OAuth.
- Email and password (optional).
- Create the application.
1.2 Development keys and local environment
From the development application, copy:
NEXT_PUBLIC_CLERK_PUBLISHABLE_KEY = pk_test_...
CLERK_SECRET_KEY                  = sk_test_...
Create .env.local in the Blaster repo:
# Clerk development keys (local only)
NEXT_PUBLIC_CLERK_PUBLISHABLE_KEY=pk_test_...
CLERK_SECRET_KEY=sk_test_...

# Database
DATABASE_URL=postgresql://user:password@localhost:5432/blaster_dev
Ensure .env.local is listed in .gitignore.
1.3 Wrap the Next.js app in ClerkProvider
In your root layout (App Router), initialise Clerk:
// app/layout.tsx
import { ClerkProvider } from '@clerk/nextjs';
import type { ReactNode } from 'react';

type RootLayoutProps = {
  children: ReactNode;
};

export default function RootLayout({ children }: RootLayoutProps) {
  const publishableKey = process.env.NEXT_PUBLIC_CLERK_PUBLISHABLE_KEY ?? '';

  if (!publishableKey) {
    console.error('Clerk publishable key is not set');
    return null;
  }

  return (
    <ClerkProvider publishableKey={publishableKey}>
      <html lang="en">
        <body>{children}</body>
      </html>
    </ClerkProvider>
  );
}
Start the dev server and confirm sign-in works at http://localhost:3000 with the dev Clerk instance.
2. Production Clerk instance and domains
2.1 Create a production Clerk instance
- In the Clerk Dashboard, create a second application:
- Name:
Blaster – Production.
- Name:
- Enable the same sign-in methods you use in development.
- Keep this instance for production only.
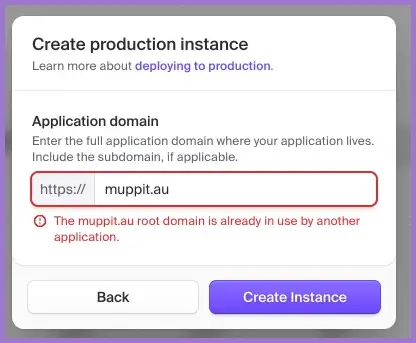
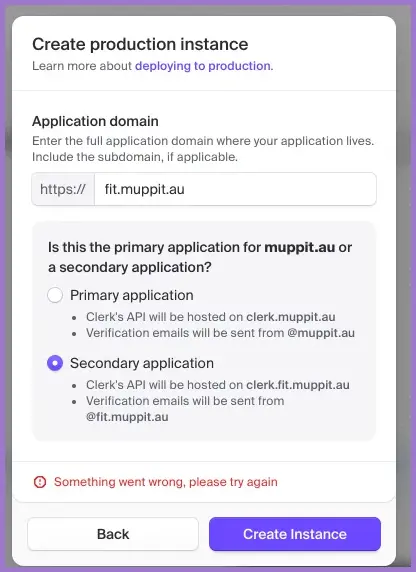
The first production instance on an application domain such as public.example.com will create accounts etc on the root. Additional production instances are available for other applications without a paid account (up to 5) or satellites (paid) and they are added as secondary instances such as fit.public.example.com.
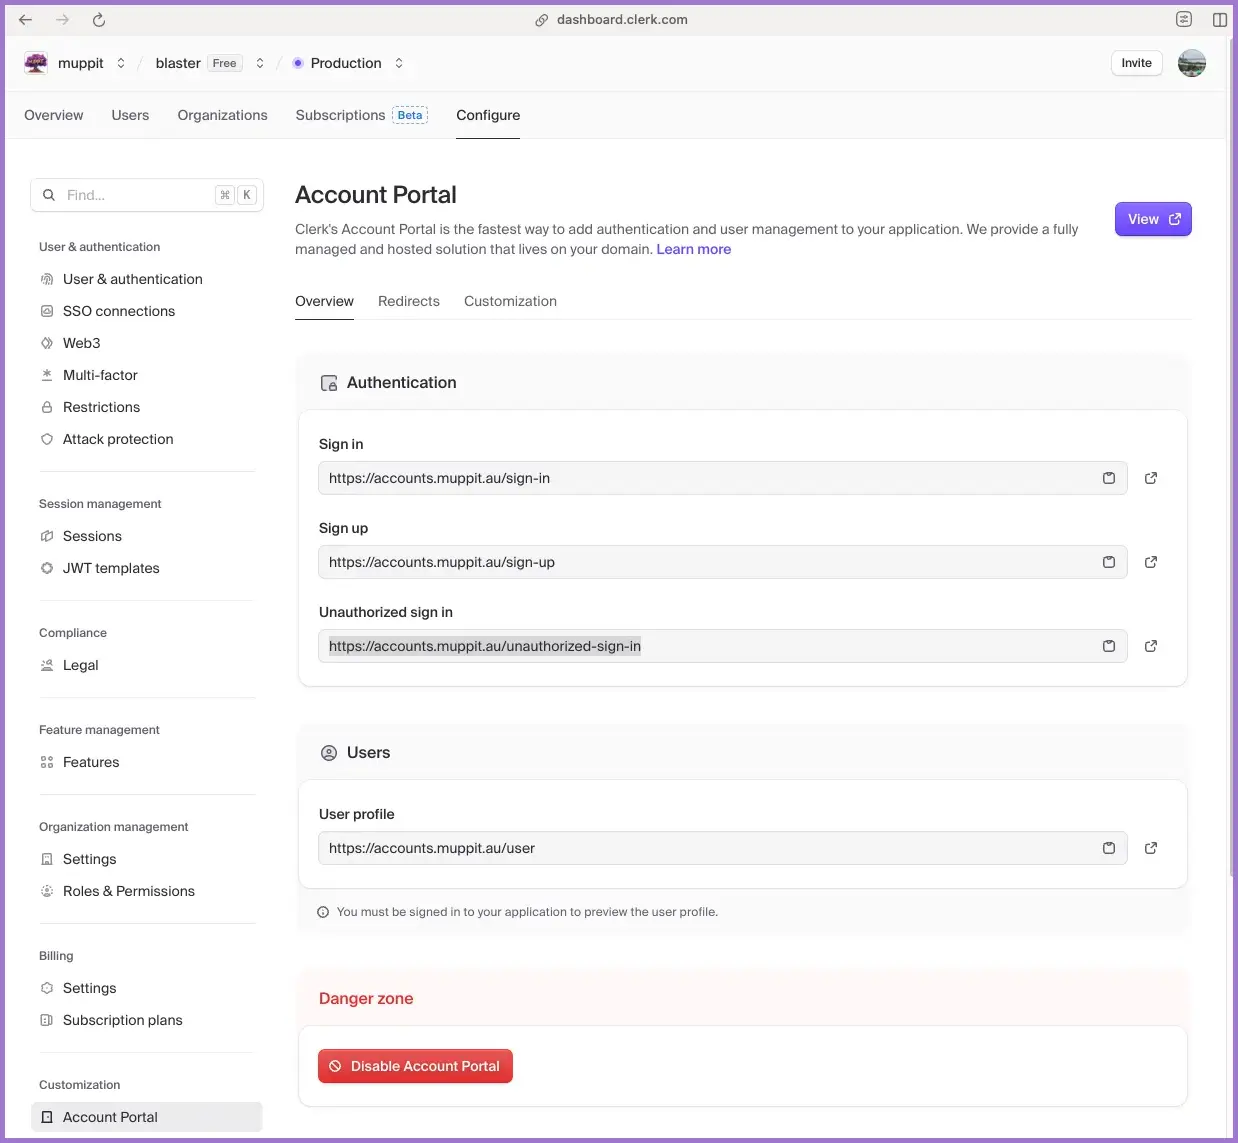
2.2 Configure the account portal custom domain
- In the production application, go to
Customisation → Account portal. - Add a custom domain such as:
accounts.yourdomain.com
- Clerk gives you a CNAME record.

Create the DNS record in your provider (for example Cloudflare):
Type:  CNAME
Name:  accounts
Value: accounts.clerk.services
Proxy: DNS only
Wait for DNS and TLS to settle, then verify the domain in Clerk.
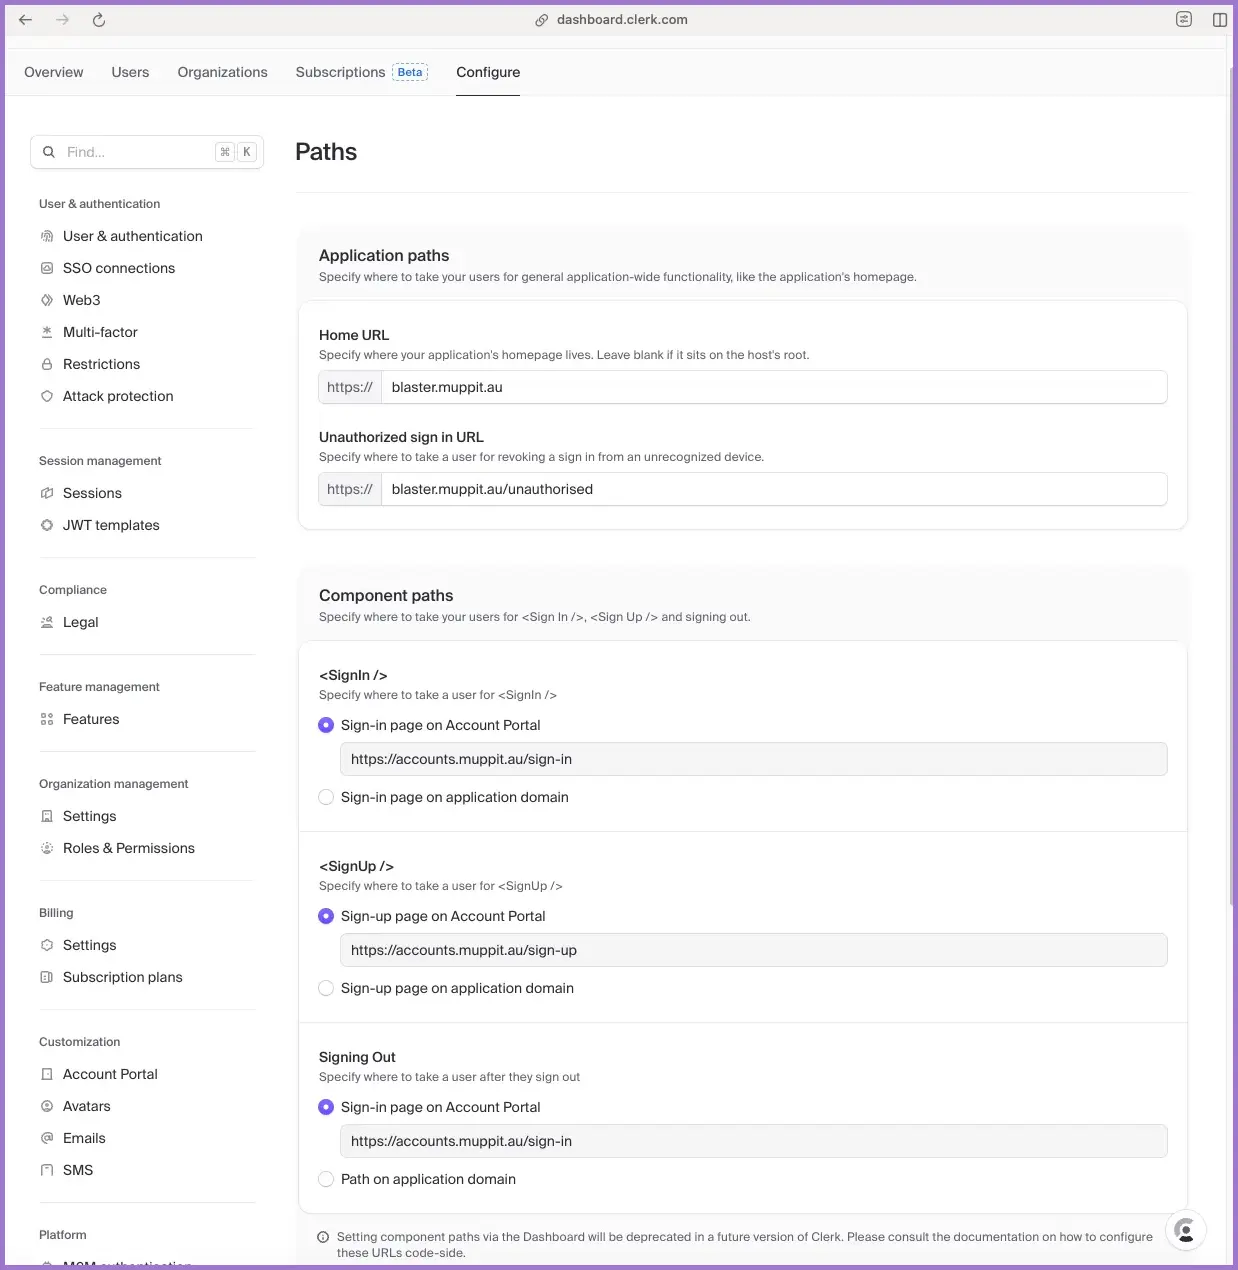
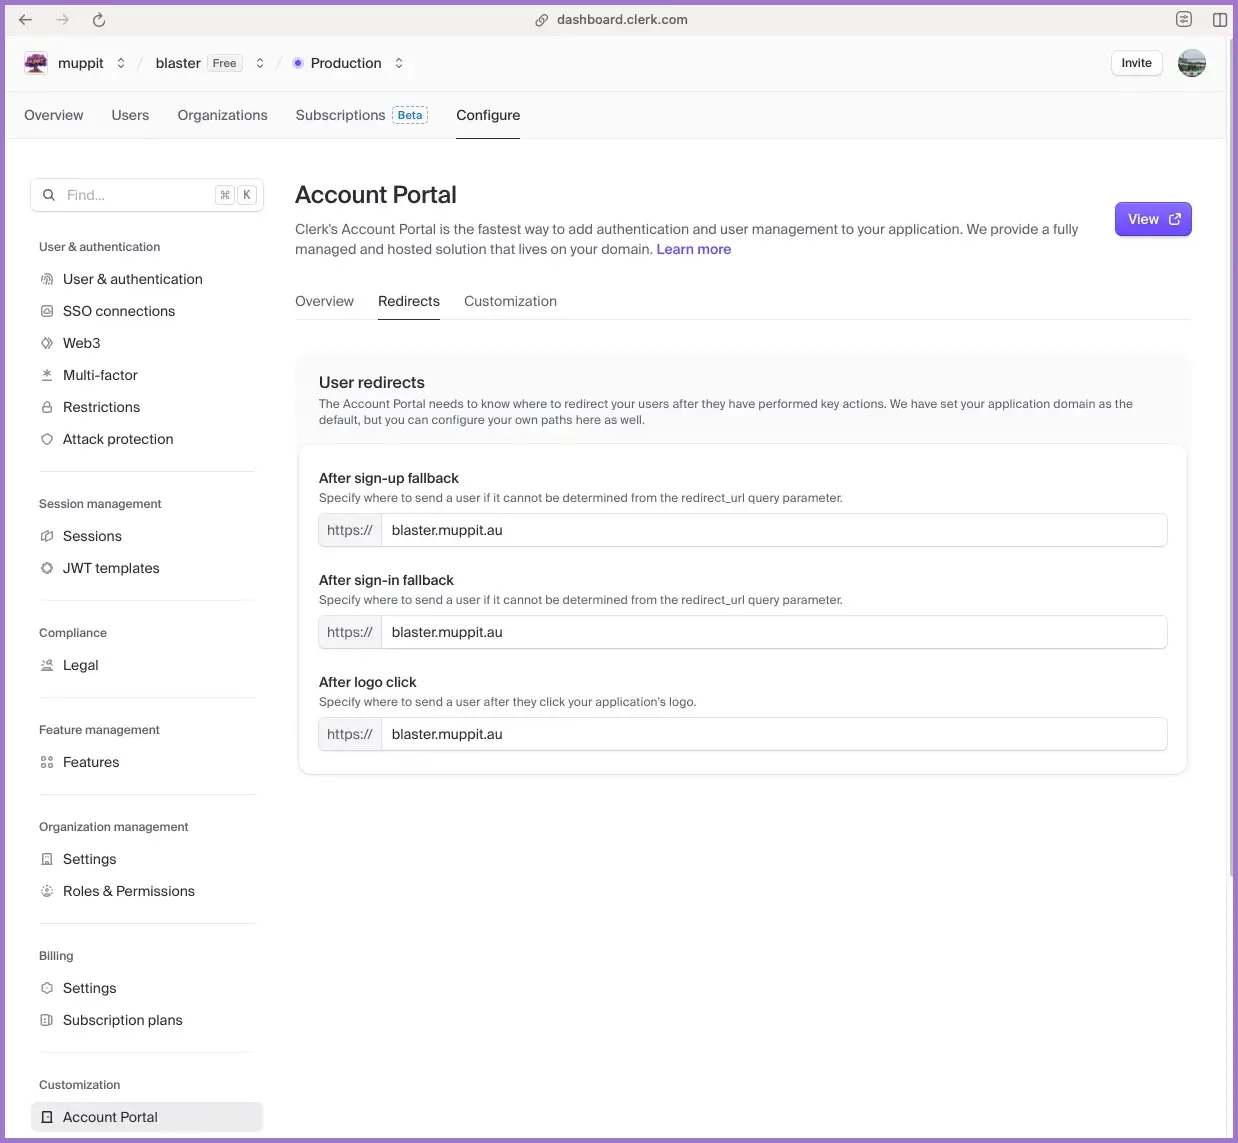
2.3 Configure paths and account portal redirects
In the production application:
- Go to
User & authentication → Pathsand set:
Home URL: https://yourdomain.com
Do not leave this blank.
- Go to
Customisation → Account portal → Redirectsand set all three values:
After sign-up fallback: https://yourdomain.com
After sign-in fallback: https://yourdomain.com
After logo click:       https://yourdomain.com
- Optionally set an unauthorised URL, for example:
Unauthorised sign-in URL: https://yourdomain.com/unauthorised
These redirects are a common source of “it works for existing users but not for new ones” bugs.
2.4 Production keys
From the production application, record:
NEXT_PUBLIC_CLERK_PUBLISHABLE_KEY = pk_live_...
CLERK_SECRET_KEY                  = sk_live_...
- The publishable key will be used by GitLab CI at build time.
- The secret key will be stored only in Kubernetes Secrets (encrypted with SOPS), not in GitLab variables.
3. Google OAuth in Clerk (summary)
The full Google OAuth flow is documented on the Google page:
At a high level you must:
- Create or select a Google Cloud project.
- Configure the OAuth consent screen (External, app name, support email, authorised domains).
- Create an OAuth client of type
Web applicationwith:- Authorised JavaScript origins such as
https://yourdomain.comandhttps://accounts.yourdomain.com. - Authorised redirect URIs such as
https://accounts.yourdomain.com/v1/oauth_callbackor the host that Clerk shows.
- Authorised JavaScript origins such as
- Paste the Google client ID and secret into the Google social connection in Clerk and enable “Use custom credentials”.
For details, error patterns and checklists, use the dedicated page rather than duplicating it here.
4. Required pages for privacy, terms and unauthorised access
Google and Clerk both expect basic policy pages to exist in production.
4.1 Privacy policy page
Add a privacy route in your app, for example:
// app/privacy/page.tsx
export default function Privacy() {
  return (
    <main>
      <h1>Privacy policy</h1>
      <p><strong>Last updated:</strong> 2025-11-20</p>

      <h2>Information we collect</h2>
      <p>When you use Blaster we may collect:</p>
      <ul>
        <li>Email address (from your identity provider).</li>
        <li>Display name and profile image.</li>
        <li>Game scores and usage analytics.</li>
      </ul>

      <h2>How we use your information</h2>
      <ul>
        <li>Authenticating your account.</li>
        <li>Persisting game progress and high scores.</li>
        <li>Displaying profile information in-game.</li>
      </ul>

      <h2>Data security</h2>
      <p>Authentication is handled by Clerk and data is stored in a managed PostgreSQL database.</p>

      <h2>Contact</h2>
      <p>
        For privacy concerns, email
        {' '}
        <a href="mailto:privacy@yourdomain.com">privacy@yourdomain.com</a>.
      </p>
    </main>
  );
}
Update the wording to match your real policy.
4.2 Terms of service page
Add a terms route, for example:
// app/terms/page.tsx
export default function Terms() {
  return (
    <main>
      <h1>Terms of service</h1>
      <p><strong>Last updated:</strong> 2025-11-20</p>

      <h2>1. Acceptance of terms</h2>
      <p>By using Blaster you agree to these terms.</p>

      <h2>2. Use of service</h2>
      <ul>
        <li>Use the service for lawful purposes only.</li>
        <li>Do not attempt to disrupt or reverse engineer the service.</li>
        <li>Do not impersonate other users.</li>
      </ul>

      <h2>3. Account termination</h2>
      <p>We may suspend access for behaviour that breaches these terms.</p>

      <h2>4. Contact</h2>
      <p>
        Questions about these terms:
        {' '}
        <a href="mailto:support@yourdomain.com">support@yourdomain.com</a>.
      </p>
    </main>
  );
}
Again, adjust to your real legal text.
4.3 Unauthorised page
Add an unauthorised route referenced by Clerk redirects, for example:
// app/unauthorised/page.tsx
export default function Unauthorised() {
  return (
    <main>
      <h1>Access not authorised</h1>
      <p>You do not have permission to access this application.</p>
      <p>
        If you believe this is incorrect, contact
        {' '}
        <a href="mailto:support@yourdomain.com">support@yourdomain.com</a>.
      </p>
      <p>
        <a href="/">Return to home</a>
      </p>
    </main>
  );
}
4.4 Configure pages into the Google consent screen
In the Google Cloud Console, on the OAuth consent screen:
- Set the privacy policy URL to
https://yourdomain.com/privacy. - Set the terms of service URL to
https://yourdomain.com/terms.
Save and continue.
5. GitLab CI configuration for Clerk publishable keys
The Clerk publishable key (NEXT_PUBLIC_CLERK_PUBLISHABLE_KEY) is read at build time by Next.js and baked into the frontend bundle. Kubernetes cannot override it later. GitLab CI must supply the correct key for each branch.
5.1 GitLab variables
In the Blaster GitLab project, go to Settings → CI/CD → Variables and create:
Development publishable key:
Key:               CLERK_KEY_DEV
Value:             pk_test_your_dev_key
Environment scope: All
Protected:         unchecked
Masked:            checked
Production publishable key:
Key:               CLERK_KEY_PROD
Value:             pk_live_your_prod_key
Environment scope: All
Protected:         unchecked
Masked:            checked
Notes:
- Publishable keys are designed to be visible in browser bundles, so masking is optional. You can still mask them if you prefer.
- Mark the production key as Protected so it is only available to protected branches such as
main.
Do not store CLERK_SECRET_KEY in GitLab variables. Keep secret keys in SOPS-encrypted Kubernetes Secrets instead.
5.2 .gitlab-ci.yml pattern
Use the variables to inject the correct key into the Docker image.
Example snippet for the develop build job:
build:develop:
  stage: build
  only:
    - develop
  script:
    - |
      export CLERK_KEY="${CLERK_KEY_DEV}"
      echo "Building with Clerk dev publishable key for develop branch"
      /kaniko/executor         --context "${CI_PROJECT_DIR}"         --dockerfile "${CI_PROJECT_DIR}/Dockerfile"         --destination "${IMAGE}"         --cache=false         --build-arg NEXT_PUBLIC_CLERK_PUBLISHABLE_KEY="${CLERK_KEY}"
Example snippet for the main build job:
build:main:
  stage: build
  only:
    - main
  script:
    - |
      export CLERK_KEY="${CLERK_KEY_PROD}"
      echo "Building with Clerk prod publishable key for main branch"
      /kaniko/executor         --context "${CI_PROJECT_DIR}"         --dockerfile "${CI_PROJECT_DIR}/Dockerfile"         --destination "${IMAGE}"         --cache=false         --build-arg NEXT_PUBLIC_CLERK_PUBLISHABLE_KEY="${CLERK_KEY}"
5.3 Dockerfile pattern
The Dockerfile must accept the Clerk key as a build argument and pass it into the Next.js build environment:
# Build stage
FROM node:18-alpine AS builder
WORKDIR /app

ARG NEXT_PUBLIC_CLERK_PUBLISHABLE_KEY
ENV NEXT_PUBLIC_CLERK_PUBLISHABLE_KEY=${NEXT_PUBLIC_CLERK_PUBLISHABLE_KEY}
ENV NEXT_TELEMETRY_DISABLED=1

COPY package*.json ./
RUN npm ci
COPY . .
RUN npm run build

# Runtime stage omitted for brevity
This ensures that the built app always uses the correct Clerk publishable key per branch.
6. Kubernetes wiring for Clerk
6.1 Namespaces and database credentials
Create a dedicated namespace for Blaster in production, for example blaster.
Provision a PostgreSQL instance and create a Secret for the database password, either manually or via SOPS.
Example (simplified, not encrypted here):
apiVersion: v1
kind: Secret
metadata:
  name: blaster-db-secret
  namespace: blaster
type: Opaque
stringData:
  POSTGRES_PASSWORD: example-password
6.2 Application Secret for Clerk
Create a Secret to hold the Clerk secret key for the production instance:
apiVersion: v1
kind: Secret
metadata:
  name: blaster-app-secret
  namespace: blaster
type: Opaque
stringData:
  CLERK_SECRET_KEY: sk_live_your_prod_secret_key
Encrypt this file with SOPS in Git and let Flux (or similar) decrypt and apply it in-cluster.
6.3 ConfigMap for non-secret configuration
Use a ConfigMap for values that can be visible, including the publishable key:
apiVersion: v1
kind: ConfigMap
metadata:
  name: blaster-config
  namespace: blaster
data:
  NEXT_PUBLIC_CLERK_PUBLISHABLE_KEY: pk_live_your_prod_key
  POSTGRES_HOST: blaster-postgres
  POSTGRES_PORT: "5432"
  POSTGRES_USER: blaster_user
  POSTGRES_DB: blaster_prod
Kubernetes cannot change the build-time Clerk key in the bundle, but including it here keeps the environment consistent and makes it easier to run database migrations from containers that also rely on the value.
6.4 Deployment pattern
Example deployment (trimmed to focus on environment wiring):
apiVersion: apps/v1
kind: Deployment
metadata:
  name: blaster-app
  namespace: blaster
spec:
  replicas: 2
  selector:
    matchLabels:
      app: blaster-app
  template:
    metadata:
      labels:
        app: blaster-app
    spec:
      containers:
        - name: blaster-app
          image: registry.example/blaster:prod
          ports:
            - containerPort: 3000
          envFrom:
            - configMapRef:
                name: blaster-config
          env:
            - name: POSTGRES_PASSWORD
              valueFrom:
                secretKeyRef:
                  name: blaster-db-secret
                  key: POSTGRES_PASSWORD
            - name: CLERK_SECRET_KEY
              valueFrom:
                secretKeyRef:
                  name: blaster-app-secret
                  key: CLERK_SECRET_KEY
          readinessProbe:
            httpGet:
              path: /
              port: 3000
            initialDelaySeconds: 10
            periodSeconds: 5
          livenessProbe:
            httpGet:
              path: /
              port: 3000
            initialDelaySeconds: 30
            periodSeconds: 10
Configure this into your existing GitOps structure and apply via Flux.
7. Testing Clerk and Google OAuth
7.1 Local testing and Clerk production keys
Clerk binds each instance to its configured domains. The Blaster production instance is configured for https://blaster.public.example.com, so you cannot sign in against the production Clerk instance from http://localhost:3000 even if Google has localhost:3000 listed as an authorised origin.
For local development at http://localhost:3000:
- Use the development Clerk application and
pk_test_...keys. - Configure Google OAuth with a dev redirect URI and
http://localhost:3000as an authorised origin.
To test the production Clerk instance and pk_live_... keys:
- Deploy Blaster to
https://blaster.public.example.com(or your production domain). - Run all Google OAuth and Clerk sign-in tests against the live production URL, not localhost.
7.2 Test flows in production
Perform these tests in an incognito browser window against the production domain:
- New user via Google: sign up with an email that has never used the app.
- Existing user via Google: sign back in with the same email.
- Email and password (if enabled): confirm email verification works and redirects go back to the app.
- Unauthorised flow: delete a test user in Clerk and confirm they are redirected to
/unauthorised.
Monitor:
- Clerk Dashboard → Users and Logs.
- Application logs in Kubernetes for authentication-related errors.
8. Common issues and quick fixes
8.1 New users redirected to the wrong domain
Symptoms:
- Existing users sign in correctly.
- New users sign up and then land on the wrong domain or a dead page.
Likely cause:
- Account portal redirect URLs are blank or pointing to an old domain.
Fix:
- In the production application, set all three account portal redirects to
https://yourdomain.comand retest with a brand new email address.
8.2 Wrong Clerk instance in production
Symptoms:
- Production app shows dev branding or dev users.
- URLs in network traffic point at the dev Clerk instance.
Likely cause:
- Dev publishable key baked into the production image.
Fix:
- Check GitLab variables for
CLERK_KEY_DEVandCLERK_KEY_PROD. - Confirm
.gitlab-ci.ymluses the production key for themainbuild. - Rebuild and redeploy.
8.3 Ingress not routing traffic
Symptoms:
- Cluster Pods are healthy but the domain does not respond.
Likely cause:
- Missing
ingressClassNameor wrong host in the Ingress.
Fix:
- Add
ingressClassName: nginx(or your controller’s class) to the Ingress spec. - Confirm the host in the rule matches your production domain.
- Reapply the manifest and check the Ingress status.
9. Verification checklist
Use this checklist once before go-live and once after first user traffic.
Clerk and domains
- Dev and prod Clerk applications created.
- Production account portal domain verified.
- Clerk Paths home URL set to
https://yourdomain.com. - All three account portal redirects set to the production app URL.
- Unauthorised redirect URL configured.
Google OAuth
- Google Cloud project created and OAuth consent screen configured.
- Authorised domains include your root domain.
- Web application OAuth client created with correct origins and redirect URIs.
- Google credentials pasted into the Google social connection in Clerk.
- Privacy and terms URLs set on the Google consent screen.
CI and build
-
CLERK_KEY_DEVGitLab variable set with the dev publishable key. -
CLERK_KEY_PRODGitLab variable set with the production publishable key and marked Protected. -
.gitlab-ci.ymlinjects the correct key per branch viaNEXT_PUBLIC_CLERK_PUBLISHABLE_KEYbuild arg. - Dockerfile reads
NEXT_PUBLIC_CLERK_PUBLISHABLE_KEYviaARGandENV.
Kubernetes
- Namespace created for Blaster.
- Database Secret created and configured into the app.
- Clerk secret key stored only in a SOPS-encrypted Secret.
- ConfigMap created for public configuration.
- Deployment uses
envFromand Secret references correctly. - Service and Ingress created, with
ingressClassNameset.
End-to-end tests
- New user Google sign-up works and returns to the correct domain.
- Existing user Google sign-in works as expected.
- Email and password flows (if enabled) behave correctly.
- Unauthorised access path works and shows the correct message.
- Application and Clerk logs are free of persistent authentication errors.