Google OAuth for Clerk (Blaster)
Use this runbook to configure Google OAuth for Clerk in the Blaster game. It focuses on Google Cloud and Clerk configuration, testing and common error patterns. CI variables and Kubernetes wiring live on the main Clerk setup page.
Blaster GitOps series
- Blaster GitOps summary
- Blaster repo and branches
- Dockerfile & GitLab CI
- Clerk authentication & user setup
- Google OAuth for Clerk - you are here
- Blaster prep for automation
- Dev app k8s manifests
- Dev flux sources & Kustomizations
- Dev image automation
- Dev SOPS & age
- Dev verification & troubleshooting
- Dev full runbook
- Prod overview
- Prod app k8s manifests and deployment
- Prod Flux GitOps and image automation
- Prod Cloudflare, Origin CA and tunnel routing
- Prod full runbook
- Post development branches
Overview
This page walks through:
- Creating Google OAuth credentials in Google Cloud Console.
- Wiring those credentials into Clerk as a social connection.
- Understanding how dev and prod environments differ for OAuth.
- Verifying sign-in and sign-out flows, and avoiding common errors.
You should already have Clerk working in development before you start, and you should treat all keys and secrets as production-grade credentials.
For environment-specific Clerk keys, GitLab CI configuration and Kubernetes Secrets, see:
Never commit secrets or JSON credential files to Git. Keep Google client secrets and Clerk secret keys in your usual secrets store (for example SOPS-encrypted Kubernetes Secrets).
1. Configure Google Cloud OAuth
1.1 Create or select a Google Cloud project
- Go to the Google Cloud Console.
- Sign in with your Google account.
- Use the project selector at the top:
- Either select an existing project, or
- Click
New project, name it something likeBlaster Game, then create it.
- Ensure the new project is selected in the header.
1.2 Configure the OAuth consent screen
- In the left-hand menu, go to
APIs & Services → OAuth consent screen. - Choose
Externalas the user type (unless you use a Google Workspace organisation). - Click
Createand complete the fields.
App information:
- App name:
Blaster Game(or your actual app name). - User support email: your email address.
- App logo: optional; you can upload a 120×120 PNG later.
App domain (usually configured once you know your production URL):
- Application home page: for example
https://blaster.public.example.com. - Application privacy policy link.
- Application terms of service link.
Authorised domains:
- Add domains such as
blaster.public.example.comandpublic.example.comwhen they are ready.
Developer contact information:
- Add at least one valid email address.
Click Save and continue.
Scopes:
- The default scopes are sufficient:
openid,emailandprofile. - Click
Save and continue.
Test users (while in Testing mode):
- While the OAuth app is in Testing mode, only test users can sign in.
- Add your own Google account and any other testers.
- Click
Save and continue, thenBack to dashboard.
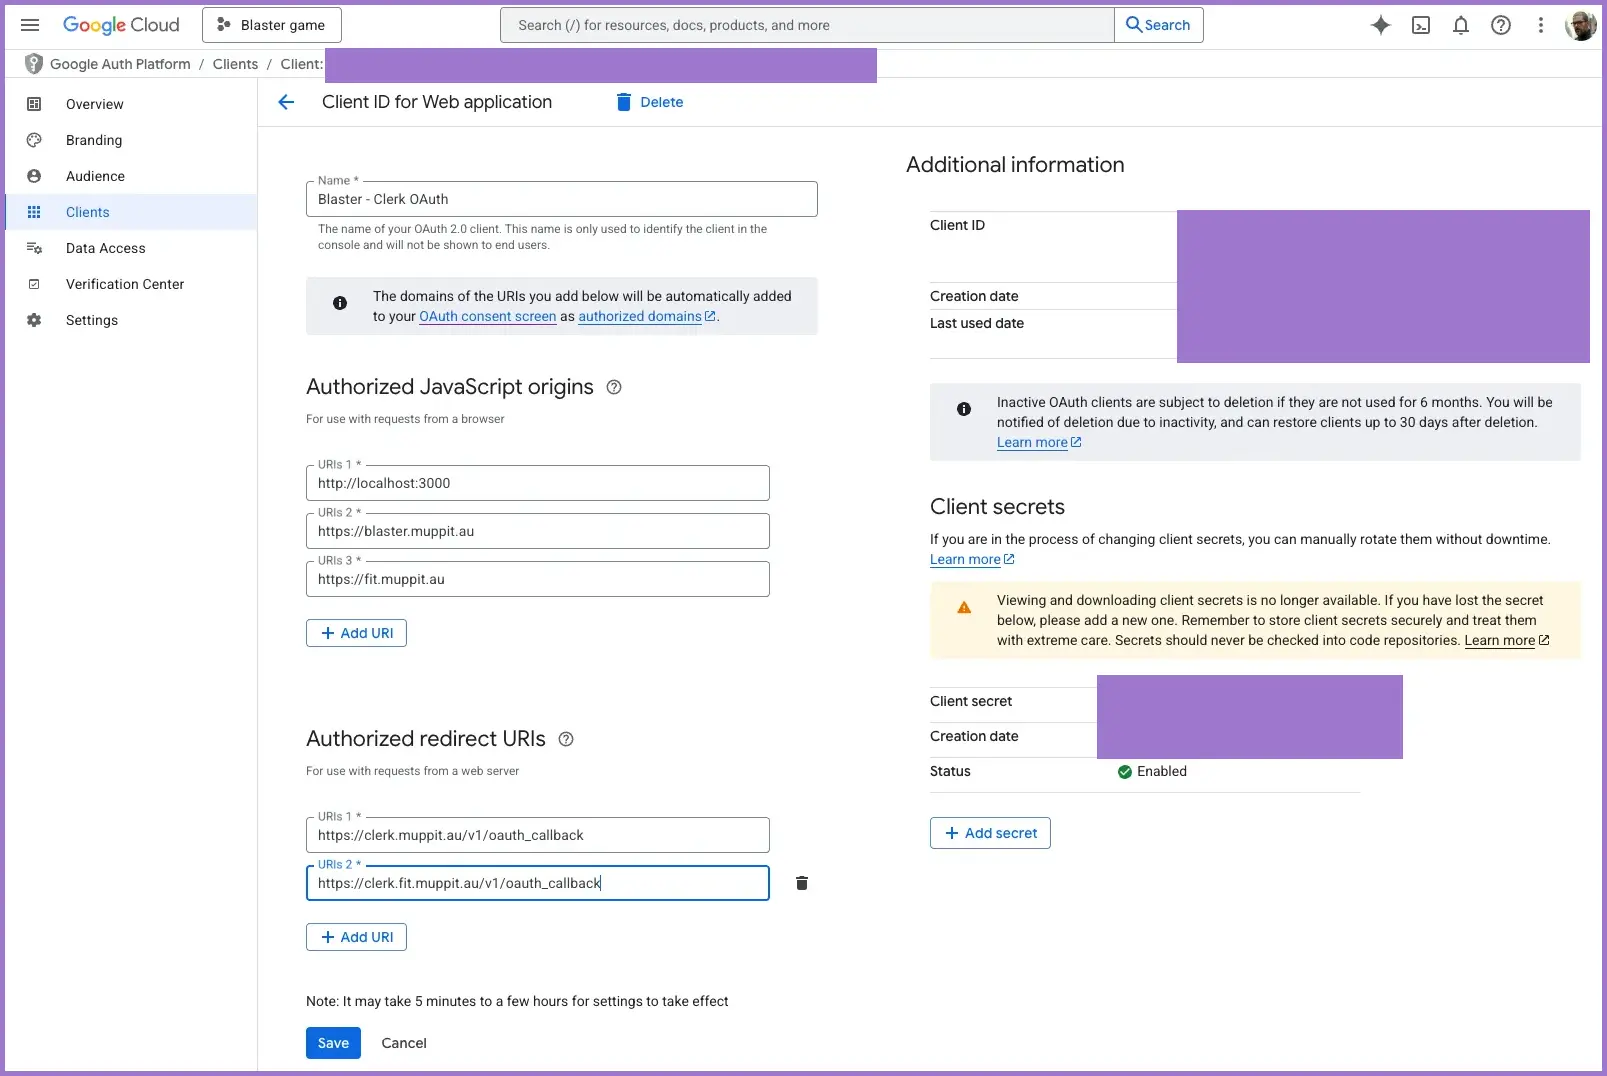
1.3 Create OAuth client credentials (Web application)
- In the left-hand menu, go to
APIs & Services → Credentials. - Click
+ Create credentialsand selectOAuth client ID. - Set Application type to
Web application. - Use a clear name such as:
Blaster - Clerk OAuth
Configure origins and redirect URIs.
Authorised JavaScript origins:
Add each origin as a separate URI:
http://localhost:3000
For local development (Clerk dev instance).
https://blaster.public.example.com
For the production Blaster domain once it is live.
Authorised redirect URIs:
You must use the exact redirect URI from your Clerk dashboard. Typical examples:
https://clerk.public.example.com/v1/oauth_callback
For a custom Clerk domain.
https://your-dev-instance.clerk.accounts.dev/v1/oauth_callback
For a Clerk-hosted development instance.
Redirect URIs must match exactly. Protocol, host, path and trailing slash must all be identical to what Clerk shows.
Click Create.
1.4 Capture the client ID and secret
After creation, Google shows a modal with values similar to:
Client ID:     123456789-abcdefghijk.apps.googleusercontent.com
Client secret: GOCSPX-abcd1234efgh5678
Actions:
- Copy both values immediately.
- Store them in a secure password manager.
- Optionally download the JSON, but never commit it to Git.
You will paste these into Clerk in the next section.
2. Configure Google as a social connection in Clerk
2.1 Open the Google social connection
- Sign in to the Clerk Dashboard.
- Select the Blaster application (dev or prod, depending on which environment you are wiring).
- Go to
User & Authentication → Social connections. - Find Google and open its configuration panel.
2.2 Configure Google with custom credentials
Set the options as follows:
- Enable for sign-up and sign-in: toggle on so users can authenticate with Google.
- Block email subaddresses: leave off unless you have a strong reason to block
user+tag@gmail.comstyle addresses. - Use custom credentials: toggle on to use your own Google OAuth client.
Then paste your credentials:
- Client ID: the value from Google Cloud Console.
- Client secret: the secret from Google Cloud Console.
Confirm the authorised redirect URI value in Clerk. It should look something like:
https://clerk.public.example.com/v1/oauth_callback
Copy this URI and verify that it appears in the Authorised redirect URIs list for the OAuth client in Google Cloud.
Scopes can usually remain at the Clerk defaults:
openid
https://www.googleapis.com/auth/userinfo.email
https://www.googleapis.com/auth/userinfo.profile
Click Update to save the configuration.
3. Clerk keys and environments (summary)
Clerk uses separate keys for development and production environments:
- Development keys start with
pk_test_andsk_test_. - Production keys start with
pk_live_andsk_live_.
For Blaster you need, per environment:
- A publishable key for builds (
NEXT_PUBLIC_CLERK_PUBLISHABLE_KEY). - A secret key for server-side use (
CLERK_SECRET_KEY).
The detailed patterns for GitLab CI variables, Docker build arguments and Kubernetes Secrets live on the main Clerk page:
Treat Google OAuth as an additional layer on top of that base: Google issues an ID token, Clerk validates it and Blaster sees a unified user identity.
4. Testing Google OAuth end to end
4.1 Local testing vs production testing
Clerk ties each instance to its configured domains.
- The Blaster development instance is configured for
http://localhost:3000and the internal dev URLs. - The Blaster production instance is configured for
https://blaster.public.example.com.
Even if Google lists http://localhost:3000 as an authorised origin, you cannot use the production Clerk instance from localhost: the login domain must match the instance configuration.
For local development at http://localhost:3000:
- Use the development Clerk application and
pk_test_...keys. - Configure Google OAuth with
http://localhost:3000as an authorised origin and the dev Clerk redirect URI.
To test the production Clerk instance and pk_live_... keys:
- Deploy Blaster to
https://blaster.public.example.com(or your production domain). - Run all Google OAuth and Clerk sign-in tests against the live production URL, not localhost.
The Clerk setup page has additional guidance on environment-specific keys and CI wiring:
4.2 Sign-out and repeated sign-in
- Sign out from the app.
- Sign back in with Google.
- Confirm the flow is smooth and does not prompt for credentials again unless you have enabled the account selector prompt.
4.3 New user flow
- In a private or incognito window, repeat the sign-in flow with a different Google account.
- Confirm that:
- The new user is created in Clerk.
- Any Blaster-side user profile or player record is created.
- Authorisation and access checks behave as expected.
5. Common problems and fixes
5.1 Redirect URI mismatch
Example error:
Error 400: redirect_uri_mismatch
The redirect URI in the request, https://clerk.public.example.com/v1/oauth_callback,
does not match the ones authorised for the OAuth client.
Fix:
- In Google Cloud Console, edit the OAuth client.
- Ensure the Authorised redirect URIs list contains the exact URI shown in Clerk.
- Check:
- Protocol (
https://). - Hostname.
- Path including
/v1/oauth_callback. - No stray trailing slash.
- Protocol (
5.2 App not verified warning
Google may display:
This app is not verified
This app has not been verified by Google yet.
For development:
- Add yourself as a test user on the OAuth consent screen.
- Use the advanced option to continue.
For production:
- Complete the consent screen details fully.
- Add a public privacy policy URL and terms of service URL (served from the app, see the Clerk setup page).
- Publish the app and follow the verification process if required.
5.3 Access denied for non-test users
Example message:
The developer has not given you access to this app.
This usually means the app is still in Testing mode and the account is not in the test user list.
Fix:
- Add the user as a test user, or
- Publish the app for public access.
5.4 Invalid client ID or secret
If Clerk reports invalid OAuth client credentials:
- Double-check the Client ID and Client secret in Clerk.
- Check for leading or trailing spaces.
- Confirm you did not accidentally swap ID and secret.
- Regenerate the client in Google Cloud if needed and update Clerk.
5.5 Development key warning from Clerk
If the app loads with a banner indicating development keys, you are still using pk_test_... and sk_test_... values where production keys are expected.
Fix:
- Update your environment variables with the production
pk_live_andsk_live_keys where appropriate. - Redeploy the app and clear browser cache if needed.
5.6 Works locally but not in production
Typical causes:
- Production environment variables for the publishable key are missing or misconfigured in CI.
- Production domain is not listed in Google authorised origins.
- Production is still configured with Clerk development keys.
- HTTPS is not correctly configured.
Fix:
- Confirm the container or Pod sees the expected values for
NEXT_PUBLIC_CLERK_PUBLISHABLE_KEYandCLERK_SECRET_KEY(see Clerk setup page for examples). - Verify the production URLs in Google Cloud and Clerk.
- Ensure HTTPS is working and enforced.
6. Security practices
Client secrets and database URLs are high-value credentials. Keep them in your encrypted secrets store (for example SOPS-encrypted Kubernetes Secrets), not in Git.
6.1 Keep Google credentials out of Git
Never commit:
- Google OAuth JSON credential files.
.envor.env.localfiles with real keys.- Raw client IDs and secrets in source code or unencrypted configuration files.
Check that local environment files are ignored:
git check-ignore .env .env.local
6.2 Use environment-specific secrets
- Use
.env.localonly for local development. - Use CI variables only for publishable keys that must be present at build time.
- Use SOPS-encrypted Kubernetes Secrets (or equivalent) for Clerk secret keys, database URLs and Google client secrets.
6.3 Keep scopes tight
For basic Google sign-in, openid, email and profile are enough. Additional scopes should only be added with a clear requirement and privacy review.
6.4 Production security checklist
- Clerk secret key is stored only in Kubernetes Secrets, not CI variables.
- Database credentials are stored only in Kubernetes Secrets.
- Google client secret is stored only in your secrets store.
- Secrets are masked in logs and never printed.
- OAuth redirect URIs are specific, not wildcards.
- Authorised origins are limited to your domains.
- Only HTTPS endpoints are used for OAuth flows.
7. Monitoring and maintenance
7.1 Google Cloud
Use the Google Cloud Console to monitor OAuth activity:
APIs & Services → OAuth consent screenfor user consent analytics.APIs & Services → Credentialsfor usage and quota views.
Watch for:
- Sudden spikes in error counts.
- Unexpected consent patterns.
7.2 Clerk
In the Clerk Dashboard:
- Use the Users view to monitor sign-up and sign-in trends.
- Check the Social connections view for the status of Google.
- Review logs for failed sign-in attempts or configuration issues.
8. Verification checklist
Use this checklist before and after going live.
Google Cloud
- OAuth consent screen configured with app name, support email and domains.
- Test users set while in Testing mode, or app published for public use.
- Web application OAuth client created.
- Authorised JavaScript origins include Blaster production and any dev URLs.
- Authorised redirect URIs include the Clerk callback URL.
- Client ID and secret stored securely.
Clerk (Google connection)
- Google social connection enabled.
- Use custom credentials enabled.
- Client ID and secret set from Google Cloud.
- Redirect URI in Clerk matches Google Cloud configuration.
- Development and production Clerk instances configured to the correct Google project.
End-to-end tests
- Google sign-in works in development with the dev Clerk instance.
- Google sign-in works in production from at least two different accounts.
- Sign-out and re-sign-in flows behave correctly.
- New user and existing user flows behave as expected.
- No
redirect_uri_mismatch, access denied or invalid client errors appear in logs.
For CI, Docker and Kubernetes-specific checks, use the checklist on the main Clerk setup page: